
When it comes to the electrical system of your motorcycle or ATV, the regulator rectifier plays a crucial role in ensuring smooth and reliable operation.
However, over time, this component can become faulty, leading to charging issues and potentially damaging other electrical components.
To avoid costly repairs and keep your vehicle running smoothly, it’s important to know how to test a regulator rectifier with a multimeter.
In this article, we’ll guide you through the process, providing clear instructions and tips to help you successfully test your regulator rectifier.
So, if you’re experiencing charging problems or suspect a faulty regulator rectifier, read on to learn How to Test a Regulator Rectifier with a Multimeter?
How to Test a Regulator Rectifier with a Multimeter?
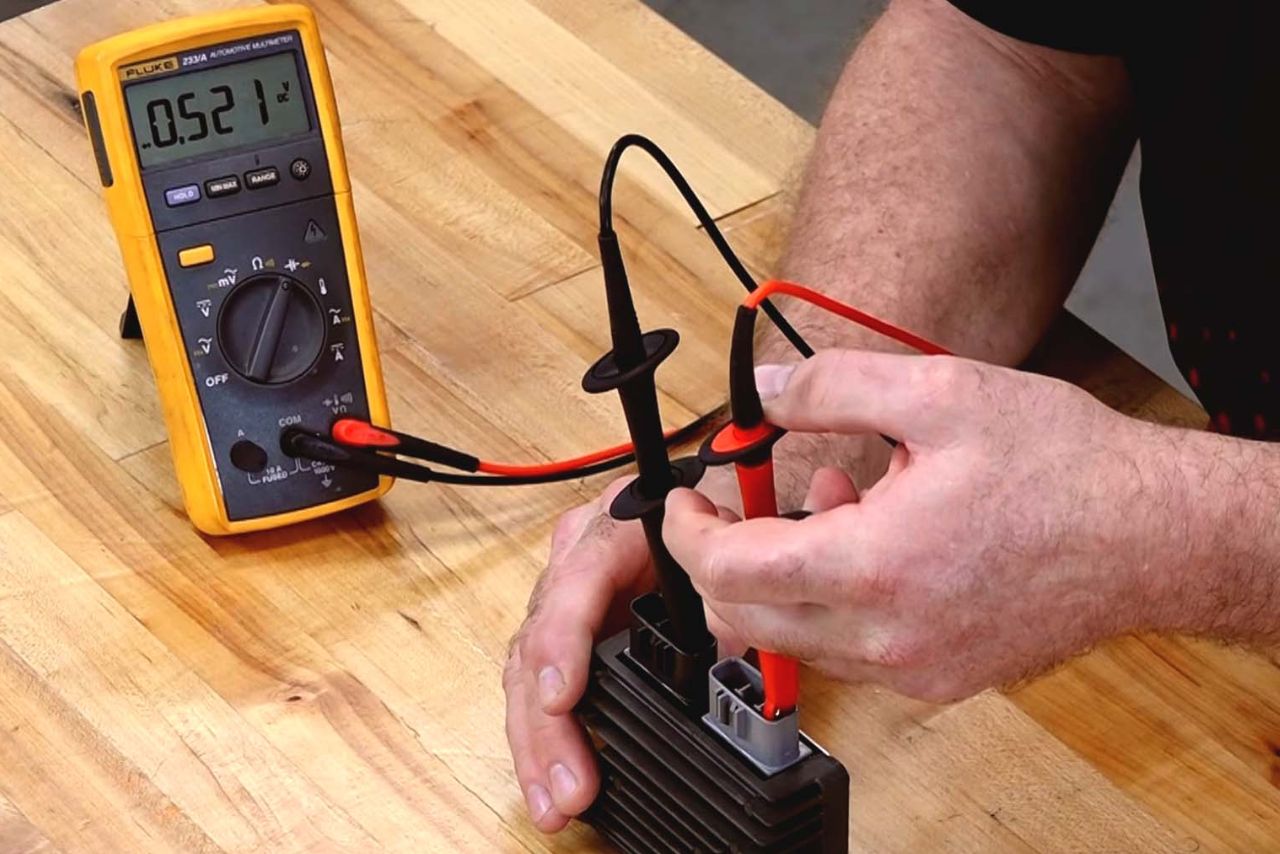
To test a regulator rectifier with a multimeter, set the multimeter to the diode test setting.
Connect the positive lead of the multimeter to the positive terminal of the regulator rectifier and the negative lead to each of the other terminals.
You should get a reading of about 0.5 to 0.7 volts in each direction. If you get a reading of 0 in one direction, the diode is bad.
Repeat steps 4-6 for the other terminals on the regulator rectifier. If any of the diodes are bad, the regulator rectifier needs to be replaced.
Understanding the Regulator Rectifier
The regulator rectifier is an essential component of a motorcycle’s charging system.
It plays a vital role in converting the alternating current (AC) produced by the motorcycle’s stator into direct current (DC) that is used to charge the battery and power the electrical system.
To understand how to test a regulator rectifier with a multimeter, it’s important to have a basic understanding of its function and components.
What is a Regulator Rectifier?


A regulator rectifier is a combination of two separate components: a voltage regulator and a rectifier.
The voltage regulator controls the amount of voltage that the charging system produces, ensuring that it doesn’t exceed safe levels.
On the other hand, the rectifier converts the AC voltage from the stator into DC voltage that the battery and electrical system can utilize.
How Does it Work?
When the motorcycle is running, the stator generates an AC voltage that varies with the engine’s RPM. The regulator rectifier takes this AC voltage and first converts it into DC voltage through the rectifier section.
It then regulates the DC voltage to ensure a steady and controlled output. This constant DC voltage charges the battery and powers the electrical system.
Signs of a Faulty Regulator Rectifier

A faulty regulator rectifier can lead to various issues, including overcharging or undercharging the battery, inconsistent electrical performance, or even complete electrical system failure.
Some common signs of a faulty regulator rectifier include:
Testing the Regulator Rectifier with a Multimeter

To test the regulator rectifier with a multimeter, you will need to follow specific steps that may vary depending on your motorcycle’s make and model.
Generally, the process involves testing the input and output voltages, as well as the continuity of various terminals. Remember to consult your motorcycle’s service manual for precise testing procedures and specifications.
In conclusion, understanding the regulator rectifier’s function and components is crucial before attempting to test it with a multimeter.
By identifying the common signs of a faulty regulator rectifier and following the appropriate testing procedures, you can diagnose any potential issues and ensure proper functioning of your motorcycle’s charging system.
Why Test the Regulator Rectifier?
The regulator rectifier plays a crucial role in the charging system of your motorcycle or ATV.
It converts the alternating current (AC) produced by the stator into direct current (DC) to power the electrical components and charge the battery.
Testing the regulator rectifier is necessary to ensure its proper functioning and to avoid potential issues down the road.
Here are a few reasons why testing the regulator rectifier is important:
Note: Always consult your vehicle’s service manual for specific instructions and safety precautions before testing the regulator rectifier.
Preparing to Test
Before you start testing a regulator rectifier with a multimeter, it’s important to take a few steps to prepare yourself and your equipment. Here are some guidelines to help you get started:
Testing the Regulator Rectifier
When it comes to testing a regulator rectifier with a multimeter, there are a few key steps to follow.
By following these steps, you can determine whether your regulator rectifier is functioning properly or if it needs to be replaced. Here’s how you can do it:
| Step | Procedure |
|---|---|
| 1 | Ensure safety by turning off the engine and disconnecting the battery. |
| 2 | Set the multimeter to the diode function or lowest resistance setting. |
| 3 | Locate the regulator rectifier near the battery or electrical components. |
| 4 | Connect the positive probe to the regulator rectifier’s output terminal. |
| 5 | Connect the negative probe to the battery’s ground or negative terminal. |
| 6 | Measure the voltage drop and compare it with the manufacturer’s specified range. |
Interpreting the Test Results
After performing the tests on the regulator rectifier using a multimeter, you will have a set of readings that need to be interpreted. Here are a few key points to consider when analyzing the test results:
Voltage Output:
Check the voltage output readings obtained during the test. Compare them with the specifications provided by the manufacturer.
If the readings are within the acceptable range, it indicates that the regulator rectifier is functioning properly.
However, if the readings are significantly higher or lower than the specified range, it could be an indication of a faulty regulator rectifier.
Resistance Values:
Examine the resistance values carefully. Ensure that the readings are consistent with the manufacturer’s specifications.
If the resistance values are within the expected range, it suggests that the regulator rectifier is operating correctly.
In case the resistance values deviate from the specified range, it may indicate a faulty component.
Watch Video: How to Test a Regulator Rectifier with a Multimeter?
Diode Test:
If your regulator rectifier has diodes, perform a diode test as part of the multimeter test. Ensure that the diode readings show a low resistance in one direction and a high resistance in the opposite direction.
If the readings are not as expected, it could imply malfunctioning diodes in the regulator rectifier.
Stator Test:
If you suspect issues with the stator, conduct a stator test using the multimeter. Compare the obtained readings with the manufacturer’s specifications.
If the readings deviate significantly, there might be problems with the stator, which could affect the performance of the regulator rectifier.
Here, we will discuss some common troubleshooting tips if you encounter any abnormalities in the test results.
| Test Result | Interpretation |
|---|---|
| Within specified range | Regulator rectifier is functioning properly |
| Higher or lower than specified range | Possible indication of a faulty regulator rectifier |
| Within expected range | Regulator rectifier is operating correctly |
| Deviation from specified range | Suggests a faulty component |
| Low resistance in one direction, high resistance in the opposite direction | Indicates proper functioning of diodes |
| Deviation from expected readings | May imply malfunctioning diodes |
| Significant deviation from manufacturer’s specifications | Possible issues with the stator |
Summary: How to Test a Regulator Rectifier with a Multimeter?
In conclusion, testing a regulator rectifier with a multimeter is a straightforward process that can help diagnose any potential issues with your electrical system.
By following the steps outlined in this article, you can determine whether your regulator rectifier is functioning properly or if it needs to be replaced.
Here are the key takeaways from this guide:
Remember, electrical systems can be complex, and incorrect testing or diagnosis can lead to further damage. If you are unsure about any part of the testing process, it is best to seek assistance from a qualified technician.
By following the steps outlined in this guide, you can effectively test your regulator rectifier and ensure that your electrical system is in good working order.
FAQs
What Is a Regulator Rectifier?
A regulator rectifier is an electrical component used in vehicles to regulate the voltage output from the alternator and to convert the AC voltage to DC voltage.
How Do I Test a Regulator Rectifier with A Multimeter?
To test a regulator rectifier with a multimeter, first check the voltage at the battery terminals.
Then connect the multimeter probes to the regulator rectifier terminals and measure the AC voltage.
The AC voltage should be within the acceptable range.
What Should I Do if The Voltage Is Not Within the Acceptable Range?
If the voltage is not within the acceptable range, the regulator rectifier may need to be replaced.
Is There Anything Else that Needs to Be Tested?
Yes, you should also test the ground connection on the regulator rectifier for continuity.
What Should I Do if The Ground Connection Fails the Test?
If the ground connection fails the test, the regulator rectifier should be replaced.