
How to Clean Wiring Harness Connectors? Cleaning wiring harness connectors is an essential maintenance task that ensures proper electrical connections and prevents any issues caused by dirt, corrosion, or other debris.
Over time, these connectors can accumulate dirt and grime, which can impede the flow of electricity and lead to unreliable connections.

Cleaning these connectors not only improves their performance but also helps to extend the lifespan of the entire electrical system.
In this article, we will guide you through the step-by-step process of cleaning wiring harness connectors effectively and safely, so you can keep your electrical connections in optimal condition.
How to Clean Wiring Harness Connectors?
Cleaning wiring harness connectors is an essential maintenance task to ensure optimal electrical connections in your vehicle. To begin, gather the necessary tools, such as a small wire brush, electrical cleaner, and compressed air.
First, remove the connectors from the wiring harness carefully. Inspect them for any dirt, debris, or corrosion. Use the wire brush to gently scrub away any visible buildup.
Next, apply the electrical cleaner to a clean cloth and wipe down the connectors thoroughly. Be sure to reach all the crevices and contact points. If there is stubborn grime, use the compressed air to blow it away.
Once clean, allow the connectors to dry completely before reattaching them to the wiring harness.
Read More: Can Car Codes Be Cleared? (Answered!)
What Can I Use to Clean Wire Harness Connectors?

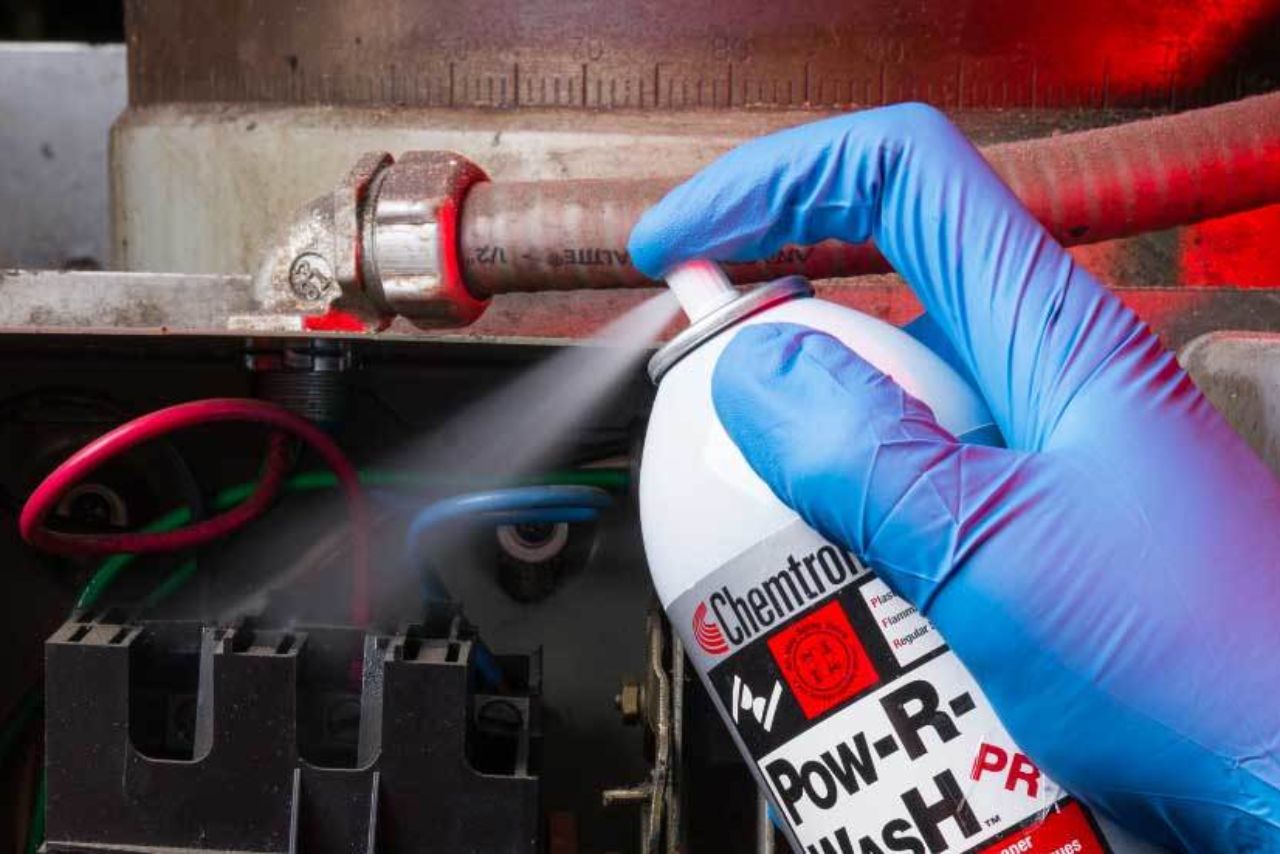
When it comes to cleaning wire harness connectors, there are a few options available. One of the most common and effective methods is to use electrical contact cleaner.
This specialized cleaner is designed to remove dirt, grease, and other contaminants from electrical connections without causing damage. Simply spray the cleaner directly onto the connectors and use a small brush or cotton swab to scrub away any stubborn residue.
Another option is to use isopropyl alcohol, which is readily available and affordable. It can be used in the same way as electrical contact cleaner, but it may not be as effective on heavy buildup.
For particularly stubborn grime, a mixture of baking soda and water can be applied to the connectors and gently scrubbed with a toothbrush. Just be sure to rinse thoroughly with clean water after cleaning.
Does WD 40 Clean Electrical Connectors?
Yes, WD-40 can be used to clean electrical connectors. It can help remove dirt, grime, and corrosion from the connectors, improving their electrical conductivity.
It is recommended to disconnect the power source before cleaning electrical connectors and ensure that the WD-40 has dried completely before reconnecting the power.
Reasons to Clean Electrical Contacts:
1: Improved conductivity: Cleaning electrical contacts removes any dirt, dust, or corrosion that may be interfering with the flow of electricity, resulting in improved conductivity and better performance.
2: Prevents malfunctioning: Dirty electrical contacts can lead to poor connections, which can cause devices or systems to malfunction or not work at all. Regular cleaning helps prevent these issues.
3: Extends lifespan: By keeping electrical contacts clean, you can prevent premature wear and tear caused by poor connections. This can extend the lifespan of your devices and equipment.
4: Reduces the risk of fire: Dust and debris accumulation on electrical contacts can increase the risk of overheating, short circuits, and even electrical fires. Regular cleaning helps reduce this risk.
5: Improves signal quality: In electronic devices that rely on clear signals, such as audio or video equipment, cleaning electrical contacts can improve signal quality and reduce interference.
Types of Electrical Contact Cleaners:
There are several types of electrical contact cleaners available on the market, each with its own specific features and benefits. Here are some common types:
1. Aerosol Contact Cleaner: This is the most popular type of contact cleaner and comes in a spray can. It typically contains a mixture of solvents that evaporate quickly, leaving no residue behind. It is effective at removing dirt, oil, grease, and other contaminants from electrical contacts, connectors, and switches.
2. Penetrating Contact Cleaner: This type of cleaner is designed to penetrate and dissolve tough contaminants. It often comes in liquid form and is applied using a brush or a syringe. It is particularly useful for cleaning heavily corroded or oxidized contacts.
3. Contact Cleaner Wipes: These are pre-moistened wipes that are convenient for cleaning small electrical components or hard-to-reach areas. They are typically impregnated with a cleaning solution that evaporates quickly, leaving no residue. Contact cleaner wipes are great for quick touch-ups and regular maintenance.
4. Contact Cleaner Lubricant: Some contact cleaners also contain lubricating properties. These cleaners not only clean the contacts but also leave behind a thin protective film that helps reduce friction and prevent future corrosion. They are ideal for applications where contacts are exposed to moisture or harsh environments.
5. Electrical Contact Cleaner Pens: These are pen-shaped contact cleaners that often come with a small brush on one end. They are easy to use and convenient for cleaning small contacts or switches. They are typically filled with a cleaning solution that evaporates quickly, leaving no residue.
Best Way to Clean Wiring Harness Connectors
The best way to clean these connectors is to start by disconnecting the negative terminal of the battery to prevent any accidental electrical shocks.
Next, inspect the connectors for any visible dirt, debris, or corrosion. Use a soft-bristle brush or a toothbrush to gently scrub away any dirt or grime.
For stubborn corrosion, a mixture of baking soda and water can be applied to the connectors. Rinse the connectors thoroughly with clean water and ensure they are completely dry before reconnecting them.
Additionally, dielectric grease can be applied to the connectors to provide protection against moisture and corrosion in the future. Here are simple steps to clean wiring harness connectors!
1. Remove the Connector from The Battery:
To remove the connector from the battery, follow these steps:
2. Preparing for Cleaning Wiring Harness Connectors:
Here are some steps to help you prepare for cleaning wiring harness connectors:
1. Gather the necessary tools: To clean wiring harness connectors, you will need a few basic tools such as a small wire brush, electrical contact cleaner, and dielectric grease. You may also need a small flathead screwdriver or a pair of needle-nose pliers to remove any retaining clips or pins.
2. Disconnect the battery: Before working on any electrical components, it’s important to disconnect the battery to prevent any accidental electrical shocks or damage. Locate the negative terminal on your battery and use a wrench to loosen and remove the negative cable.
3. Locate the wiring harness connectors: Depending on your vehicle, the wiring harness connectors may be located in different areas. Common locations include the engine bay, under the dashboard, or behind trim panels.
4. Inspect the connectors: Before cleaning, visually inspect the connectors for any signs of dirt, corrosion, or damage. Look for any loose or bent pins, broken retaining clips, or melted plastic.
5. Remove the connectors: Depending on the type of connector, you may need to use a small flathead screwdriver or needle-nose pliers to release any retaining clips or pins. Carefully disconnect each connector, taking note of their orientation and any markings that may indicate their correct placement.
6. Clean the connectors: Once the connectors are removed, use a small wire brush to gently scrub away any dirt, grime, or corrosion. Be careful not to apply too much pressure or damage the pins or connectors. After cleaning, use electrical contact cleaner to remove any remaining residue and ensure a clean surface.
4. Clean the Battery Connection:
This simple maintenance task can prevent corrosion and improve the overall functionality of your device.
Start by turning off the device and removing the battery. Inspect the battery connection for any signs of dirt, dust, or corrosion. If you notice any buildup, gently clean the connection using a cotton swab dipped in rubbing alcohol.
Be sure to clean both the battery and the device’s battery compartment thoroughly. Once you have cleaned the connection, allow it to dry completely before reinserting the battery and turning the device back on.
5. Dealing with Stubborn Dirt or Corrosion:
When it comes to dealing with stubborn dirt or corrosion, it is important to have the right tools and techniques at your disposal. First and foremost, you should assess the extent of the dirt or corrosion to determine the best course of action.
For smaller areas, a gentle scrubbing with a soft bristle brush and mild detergent may do the trick. However, for more stubborn and resistant dirt or corrosion, you may need to consider using specialized cleaning solutions or even mechanical methods such as sanding or scraping.
Remember to always wear protective gear such as gloves and goggles to ensure your safety. Additionally, it is crucial to follow the manufacturer’s instructions when using any cleaning products or equipment.
6. Reinstall the Battery Terminal:
To successfully reinstall the battery terminal that was previously removed during the cleaning of the wiring harness, follow these simple steps. First, ensure that the area surrounding the battery is clear of any debris or obstructions.
Next, carefully align the terminal with the corresponding battery post, making sure that the positive and negative terminals are correctly matched. Once the terminal is in position, firmly press it down onto the battery post, ensuring a secure connection.
To further secure the terminal, use a wrench or socket to tighten the terminal nut, being careful not to overtighten and risk damaging the battery or terminal. Finally, verify that the terminal is securely attached by giving it a gentle tug to ensure that it does not come loose.
7. Preventive Measures for Maintaining Clean Connectors
- Regularly clean connectors with a soft brush or cloth to remove dust and debris.
- Avoid touching connectors with dirty or greasy hands to prevent contamination.
- Use compressed air to blow away any loose particles from connectors.
- Inspect connectors for any signs of corrosion or damage and replace if necessary.
- Keep connectors dry and avoid exposing them to moisture or water.
- Use dielectric grease or silicone lubricant on connectors to protect against moisture and improve conductivity.
- Store connectors in a clean and dry environment when not in use to prevent dirt and dust buildup.
Conclusion and Final Thoughts!
Cleaning wiring harness connectors is an essential maintenance task that ensures optimal electrical performance in your vehicle. To begin the process, first, gather the necessary supplies: contact cleaner spray, a small brush or toothbrush, and a lint-free cloth.
Start by disconnecting the battery to ensure safety. Inspect the connectors for any signs of corrosion, dirt, or grime buildup. If you notice any, use the brush to gently remove loose particles.
Next, apply the contact cleaner spray directly onto the connectors and allow it to penetrate for a few minutes. Use the brush or toothbrush to scrub away any remaining debris.
Once clean, wipe off any excess cleaner with a lint-free cloth. It’s crucial to ensure that all connectors are completely dry before reconnecting them to avoid short circuits or other electrical issues.
FAQs
How Often Should I Clean My Wiring Harness Connectors?
It is recommended to clean your wiring harness connectors at least once a year or whenever you notice any signs of dirt, corrosion, or poor connection.
What Tools Do I Need to Clean Wiring Harness Connectors?
You will need a contact cleaner or electrical contact cleaner, a small brush or toothbrush, and a lint-free cloth or paper towel. A can of compressed air can also be helpful for removing debris.
How Do I Clean the Wiring Harness Connectors?
Start by disconnecting the wiring harness connectors and inspecting them for any visible dirt or corrosion. Use the brush or toothbrush to gently scrub the connectors, removing any grime or corrosion.
Then, spray the contact cleaner onto the connectors and use the brush again to clean them thoroughly.
Finally, wipe the connectors with a lint-free cloth or paper towel to remove any remaining residue.
Can I Use Water to Clean Wiring Harness Connectors?
Water should not be used to clean wiring harness connectors as it can cause damage and corrosion. It is best to use a contact cleaner specifically designed for electrical components.
Are There Any Precautions I Should Take While Cleaning Wiring Harness Connectors?
Yes, it is important to disconnect any power sources before cleaning the connectors to avoid electrical shock. Additionally, be gentle when scrubbing the connectors to avoid damaging the delicate pins or wires.
Finally, allow the connectors to dry completely before reconnecting them to ensure a secure connection.
Latest Posts:
- Benelli TNT 135 vs Grom! (A Proper Review!)

- What Problems Does The Kymco Ak 550 Have? Find Solution!

- Jetson Bolt Pro Troubleshooting! (The Ultimate Guide!)

- Top 10 Best Electric Scooters For Kids (Tried And Tested!)

- 10 Best 150cc Bike For Beginners: (Tried And Tested!)

- What Does 16 Mean To The Pagans? (The Surprising Truth!)