Bird scooters are revolutionizing the way people commute everyday. They are fun, convenient and environmentally-friendly, making them a favorite among many. Unfortunately, electric scooters can be a bit of a mystery to wiring diagram enthusiasts.
If you’re one of the many people who have taken up electric scooters as a mode of transportation, you may be wondering how to wire a bird scooter. While it may seem like a daunting task, it’s actually quite simple. This article will provide a bird scooter wiring diagram to help you get started.
Bird Scooter Wiring Diagram: A Bird scooter wiring diagram can help you understand how the scooter works and how to wire it properly. Whether you’re doing preventive maintenance or troubleshooting, a wiring diagram can be a valuable tool.
Luckily, we’ve got a comprehensive wiring diagram for you. Bird scooters are powered by batteries, which are connected to the motor via a series of wires. The battery provides power to the motor, which in turn propels the scooter forward.
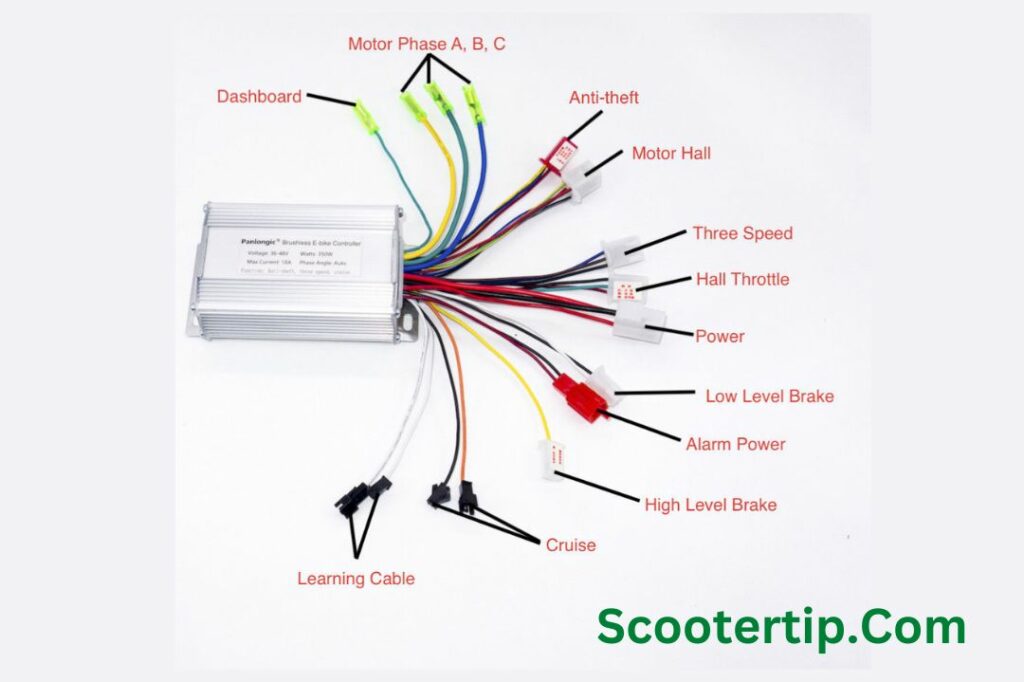
The battery is connected to the motor via positive and negative wires. The positive wire carries the current from the battery to the motor, while the negative wire returns it back to the battery. A controller is also connected to the motor, which regulates the amount of power that is delivered to it.
What Is A Bird Scooter Wiring Diagram?
A Bird scooter wiring diagram is a detailed schematic of the electrical system on a Bird scooter. It shows how each component of the system is interconnected, and can be used to troubleshoot or repair problems with the scooter.
A wiring diagram is essential for anyone working on an electric scooter, and can save a lot of time and frustration.
Standard Symbols On Wiring Diagrams:
There are a few standard symbols that are used on wiring diagrams to represent different components in the electrical system. These symbols can vary slightly from one manufacturer to another, but the basic shapes and meanings are usually the same.
Here are some of the most common symbols you’ll see on Bird scooter wiring diagrams:
Battery: This symbol represents the scooter’s battery, and is usually shown as a rectangle with positive and negative terminals marked inside.
Motor: The motor is represented by a circle with two arrows coming out of it, to indicate the direction of rotation.
Controller: The controller is typically shown as a box with various terminals and connection points inside.
Throttle: The throttle is represented by a simple line with an arrowhead, to indicate the direction of flow.
Brake: The brake is usually shown as a simple line with a circle around it, to indicate that it cuts off the flow of electricity.
Wiring An Bird Electric Scooter:
Before you can start wiring an electric scooter, you’ll need to determine the electrical system configuration. This will include understanding which wires go where, and checking to see if any existing wires need to be replaced.

Once the electrical system is configured, it’s time to start wiring it up. The wiring diagram will show you where each wire goes, and what colors they should be in.
Basic Steps:
Refer to your wiring diagram and connect all components (power switch, throttle, motor, battery charger port) except for the battery/batteries.
If your scooter uses more than one battery, connect the batteries first using a positive (red) wire from the positive (red) terminal of the first battery to the negative (black) terminal of the second battery.
Next, use a positive wire to connect the positive (red) terminal of the second battery to your fuse or circuit breaker. Then, connect the fuse or circuit breaker to the speed controller using another positive wire.
To finish, use a negative wire to connect the first battery pack to the speed controller from its negative (black) terminal. Be sure to double-check your wires carefully to avoid any errors, and then flip the power switch to turn it on.
Wiring Schematic For a Bird Scooter:
A basic wiring schematic for an electric scooter will show visual representations of the following components and the proper wiring needed to connect them, usually referred to as the speed controller’s wiring directions. The components are:
- Speed Controller
- Power Switch
- Battery Charger Port
- Throttle
- Battery Pack w/ Fuse or Circuit Breaker
- Motor
In this basic diagram, you’ll see that all components are wired directly to the speed controller, with the exception of the battery pack or packs. The positive (red) terminal of the battery pack(s) will be connected to the speed controller via a fuse or circuit breaker using two positive (red) wires.
One black (negative) wire will connect the battery’s negative terminal directly to the speed controllers black (negative) battery terminal.
When working with electricity, be sure to always use the correct fuse or circuit breaker as specified by the wiring diagram. Incorrect wiring can damage components and cause them to malfunction. Luckily, we have a DIY guide on how to repair an electric scooter controller.
How Do You Hot Wire A Bird Electric Scooter In Order For It To Operate?
In order to hot wire a Bird electric scooter, you will need to connect the positive (red) terminal of the battery pack to the speed controller via a fuse or circuit breaker. Then follow these simple steps to hotwire your bird scooter:
Choose the Correct Battery for Your Bird Scooter:
There are a few things to consider when choosing the right battery for your bird scooter. The first is the type of battery you need. The most common type of battery for bird scooters is a lithium ion battery. These batteries are lightweight and have a long life, making them ideal for use in electric scooters.
The second thing to consider is the capacity of the battery. This is measured in watt hours (Wh) and will be listed on the battery pack. The higher the capacity, the longer the battery will last before needing to be recharged.
Connect the Battery and Regulator:
In order to connect the battery and regulator, you will need to first connect the positive (red) terminal of the battery pack to the speed controller. Then, use a negative (black) wire to connect the battery pack to the speed controller from its negative terminal.
Be sure to double-check your wires carefully to avoid any errors. Once everything is connected, flip the power switch to turn it on.
Connect the Motor Lead:
The next step is to connect the motor lead. This is a wire that runs from the speed controller to the motor. Once it is connected, you can turn on the power and test out your new scooter. Be sure to take it for a test ride in a safe area before taking it out on the road.
Connect the Left Handlebar Lead:
The next step is to connect the left handlebar lead. This is a wire that runs from the speed controller to the left handlebar. Once it is connected, you can turn on the power and test out your new scooter. Be sure to take it for a test ride in a safe area before taking it out on the road.
Connect the Right Handlebar Lead:
The next step is to connect the right handlebar lead. This is a wire that runs from the speed controller to the right handlebar. Once it is connected, you can turn on the power and test out your new scooter.
Connect the Brake Lead:
The second last step in setting up your scooter is to connect the brake lead. This is a wire that runs from the speed controller to the brake.
Once it is connected, you can turn on the power and test out your new scooter.
Connect the throttle lead:
The next step is to connect the throttle lead. This is a wire that runs from the speed controller to the throttle. Once it is connected, you can turn on the power and test out your new scooter.
Wiring Diagrams for Other Models:
If you’re looking for wiring diagrams for other models of Bird scooters, you’re in luck. We’ve got wiring diagrams for the Bird One, Bird Two, and Bird Three scooters.
So no matter which model you have, we’ve got you covered. Just follow the diagrams and you’ll be up and running in no time.
How to Use the Wiring Diagrams?
The wiring diagrams for Bird scooters are very easy to follow. Simply locate the diagram for your model of scooter and follow the instructions.
If you have any questions, be sure to consult the manufacturer’s website or a qualified electrician. With your new scooter all set up and ready to go, you’ll be zipping around town in no time!
Conclusion: Bird Scooter Wiring Diagram:
In this article, we’ve discussed the wiring diagram for the Bird One scooter. This diagram is very easy to follow and will help you get your scooter up and running in no time.
Be sure to check out our other articles for wiring diagrams for other models of electric scooters. With your new scooter all set up and ready to go, you’ll be zipping around town in no time!
FAQS
Is A Wiring Diagram Different From A Schematic?
A wiring diagram is a visual representation of the electrical wiring in a building or vehicle. A schematic, on the other hand, is a detailed description of the electrical circuitry. Both are important in understanding how an electrical device works.
Is It Safe To Do My Own Wiring On My Electric Scooter?
Yes, it is safe to do your own wiring on your electric scooter. However, if you are not familiar with electrical wiring, it is recommended that you consult a qualified electrician.
How Is A Wiring Diagram Different From A Pictorial Diagram?
A wiring diagram is a visual representation of the electrical wiring in a building or vehicle. A pictorial diagram, on the other hand, is a drawing that shows the details of an electrical device. Both are important in understanding how an electrical device works.
How Much Does A Bird Scooter Charger Make?
A Bird scooter charger makes a great gift for any electric scooter lover! It’s a small, portable device that allows you to recharge your Bird One or other electric scooters.
How Do You Bypass GPS On A Bird Scooter?
If you’re looking to bypass GPS on your Bird scooter, you’ll need to consult a qualified hacker. Bypassing GPS on your Bird scooter will allow you to ride without being tracked.